MakeUseOf.com: “Cool Websites and Tools [July 30th]” plus 6 more | |

- Cool Websites and Tools [July 30th]
- The 5 Best Questions From You [MakeUseOf Answers]
- Protect Your Computers with Returnil Virtual System 2010 [Giveaway]
- WordTwit – Slick Wordpress Plugin For Twitter Integration
- Hot Tech Deals [July 30th]
- How To Boost The Colors In Your Photos Using iPhoto ‘09 [Mac]
- QuuxPlayer – An Alternative Light Music Player for Windows
| Cool Websites and Tools [July 30th] Posted: 30 Jul 2010 08:31 PM PDT
These are just half of the websites that we discovered in the last couple of days. If you want us to send you daily round-ups of all cool websites we come across, leave your email here. Or follow us via RSS feed. NEW: Download MakeUseOf iPhone App. FREE!
    
Similar MakeUseOf Articles
| ||||||||||||||||||||||||
| The 5 Best Questions From You [MakeUseOf Answers] Posted: 30 Jul 2010 06:31 PM PDT
That’s if you happen to be as lucky as Andrew Keim, who is this week’s winner of the Best Answer of the Week contest. We have rewarded him with $50 for his answers to this question: “How can I get past K9 web protection on Windows?” Congratulations Andrew! Wonder how you can participate? Just answer questions using your eMail address, Disqus, or Facebook account. That’s all. And here are the best questions from the past week:
For more accumulated wisdom, browse MakeUseOf Answers. You can view Latest Questions, Unanswered Questions or Most Popular Questions. For regular updates subscribe to the Answers RSS Feed. Need help? Ask your question at MakeUseOf Answers! Free, no signup, no spam. NEW: Download MakeUseOf iPhone App. FREE!

Similar MakeUseOf Articles
| ||||||||||||||||||||||||
| Protect Your Computers with Returnil Virtual System 2010 [Giveaway] Posted: 30 Jul 2010 04:30 PM PDT
Returnil Virtual System 2010 (RVS) is a new product that uses a combination of antivirus, antimalware, and a virtual system to protect your computer from all types of threats. Essentially, it clones your operating system and creates a virtual environment for your PC. This allows you to work in an isolated environment and keep your actual operating system from getting viruses, trojans, and malware. This week, we will be giving away 10 licenses for Returnil Virtual System 2010 Home Lux worth $400 in total! Each license can be activated on 5 computers, securing your entire household. Find out how you can get your hands on a copy below!
When your computer loads back up again, you will see a bar at the top right portion of your screen indicating that Returnil is set to Off. Left-clicking the button drops down a menu with options to enable RVS, check for updates, exit the program, and show the program on the desktop/tray area.
When you click Show Program, the main screen appears. From here, you can see if virus protection is enabled, run a quick or full system scan, enable virtual system, and check for updates.
Clicking on one of the options takes you to this tabbed screen. The layout is very simple and you can get to all of the available options by clicking on one of the tabs on the left or the links at the top of the screen.
When clicking on Quick System Scan, a box pops up and the scan begins. If the antivirus database is outdated (it will be at first install), it will start by updating it. Then it will scan all the essential areas of your PC. To scan every file on your computer, all you have to do is select Full System Scan.
On the System Safe tab, you can enable the virtual system. Simply click the Enable it now button and the system starts immediately. You will not notice any change to your system at all in this mode, but you are actually isolated from potential threats. You can alter how the program works after a restart and at startup.
When you have the System Safe enabled, the Tools tab provides additional functions. You can use the File Manager to save content to your computer’s real hard-disk, as well as create virtual disks and access files on your real system. How do I win a copy?It’s simple, just follow the instructions.
This giveaway begins now and ends Friday, 6th August at 2100hrs PST. The winners will be selected at random and announced via email. Spread the word to your friends and have fun! MakeUseOf would like to thank Virpi from Returnil for his generosity while participating in this giveaway. Interesting in sponsoring? We’d love to hear from you. Get in touch with us via email. Hey Facebookers, make sure to check out MakeUseOf page on Facebook. Over 24,000 fans already!

Similar MakeUseOf Articles
| ||||||||||||||||||||||||
| WordTwit – Slick Wordpress Plugin For Twitter Integration Posted: 30 Jul 2010 02:31 PM PDT
That’s all fine and good, but what if there was a plugin that did more? Take a look at WordTwit and you’ll see how the integration of many different options and tools can make your blog’s connection to Twitter that much more productive. With WordTwit installed whenever you publish new content from WordPress, Twitter will automatically be updated with a brief description of your new content along with a link back to it, bringing additional traffic and visitors to your website.
Choose A URL Shortening Service
One cool feature of WordTwit is the ability to choose what URL shortening service you wish to use. This allows you the blogger to choose the same service you have been using. As for me, I love using HootSuite and the Ow.Ly shortening service so I am glad WordTwit offers this. Sign In & Authorize The Use Of Your Twitter Account
This is a common occurrence with programs that interact with Twitter. All you have to do is click the “Sign in with Twitter” button and authorize it. I noticed that upon doing this, the URL shortening service box went back to the default so make sure, once again, you choose the service that you want. Edit The Text Of The Tweet To Be Tweeted
Another cool feature that WordTwit offers is the ability to change the text of the tweet to be sent out. You can put whatever you want and use [title] where you want the title to appear and [link] where you want the link to appear. Modify The Options For Tags & Categories
With WordTwit you can actually choose which categories and tags you want to include or exclude. Enter the categories and tags separated by commas and decide whether you want to include them or exclude them. Of course you can also choose to leave this option blank to have all posts tweeted about. There Are Also Advanced OptionsThere are a few advanced options that you may or may not choose to make use of. First, there is the option to include tags for UTM (look it up) for the purposes of statistics tracking. Also, there is an option for enabling the Tweet Queue for failed tweets (still experimental). Overall, WordTwit is a simple to use yet flexible plugin allowing the blogger to use Twitter effortlessly with his blog.
Remember that as a member of the Twitter community, if all you do is post links to your blog posts that you probably won’t build much of a following. There are more sources out there that can help you learn how to use Twitter properly. You wouldn’t want to be annoying, would you? There are two really good sources that may help. The first is MakeUseOf’s Twitter Guide which is an awesome introduction to Twitter. Then there is a blog called Twitip (a review) run by Darren Rowse that offers all kinds of advice about using Twitter to the fullest. What tools or plugins do you recommend for integrating a blog with Twitter? Follow MakeUseOf on Twitter. Includes cool extras.

Similar MakeUseOf Articles
| ||||||||||||||||||||||||
| Posted: 30 Jul 2010 01:30 PM PDT
For more fresh hot deals, visit our Hot Tech Deals page, which is constantly updated.
Image credit: Modified from Svengraph’s icon set Follow MakeUseOf on Twitter. Includes cool extras.

Similar MakeUseOf Articles
| ||||||||||||||||||||||||
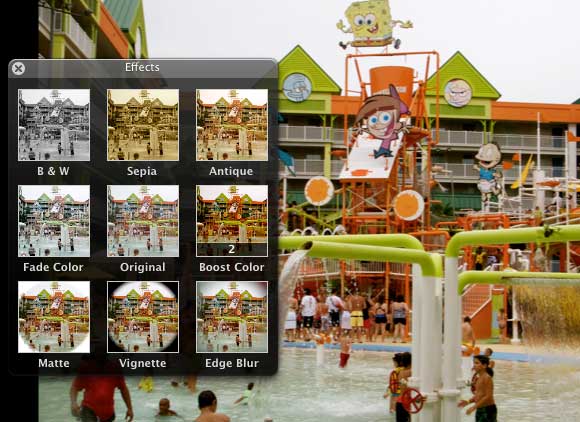
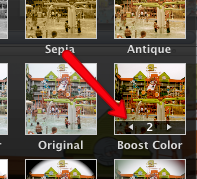
| How To Boost The Colors In Your Photos Using iPhoto ‘09 [Mac] Posted: 30 Jul 2010 12:31 PM PDT
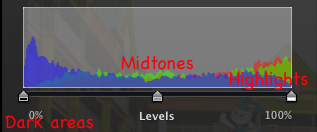
In fact, after going through this tutorial, you will see that nearly every photo you take can be significantly enhanced using these or similar color adjustments. So fire up iPhoto ‘09 and let's try out an example. You can use any color photo that is relatively well exposed and not blurry.
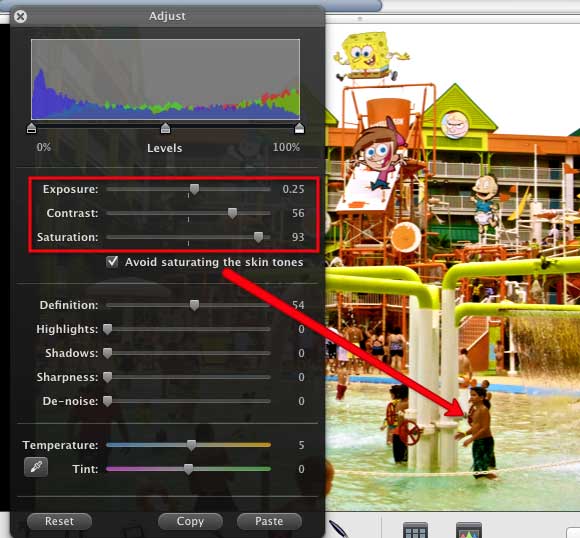
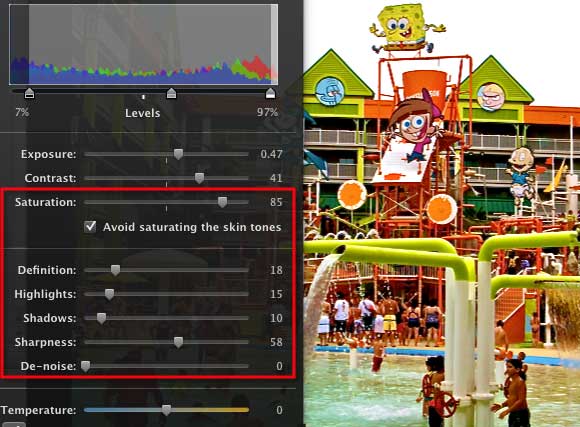
Contrast, Saturation & Definition
Now if you think that's a lot of work, you might be happy to know that you can actually copy and paste the adjustments you just made and apply them to another image that is similar in exposure. Just click the Copy button; navigate to your next image and click Paste. From there you can make minor adjustments if needed. For additional iPhoto tutorials, check out How to Edit Photos Easily with iPhoto, and other related articles. Let us know if you find this tutorial helpful or what problems you encountered when doing it. Got Questions? Ask Them Now FREE on MakeUseOf Answers!

Similar MakeUseOf Articles
| ||||||||||||||||||||||||
| QuuxPlayer – An Alternative Light Music Player for Windows Posted: 30 Jul 2010 11:31 AM PDT
QuuxPlayer is built around the idea that listening to music has more to do with the ears than the eyes. So, to a certain extent QuuxPlayer does away with a flashy interface, keeps it simple, and affords an intuitive music listening experience right from the time you install it.
But these features come second to the ease with which QuuxPlayer springs up from the blocks and starts playing your songs. Let's start it up and give it a run around a few songs. The First ScreenQuuxPlayer gets down to business from the very first screen. Add tracks to your library and play the music while you tinker around with the other features.
Simple Navigation
QuuxPlayer makes navigation really simple with the keyboard (or if you have one – a game pad controller). Pressing keys like the spacebar or the F9 takes you from one screen to the next. For instance, with the F9 key you can cycle through these screens in succession: Main Screen – Current Song Lyrics – Album Details – Main Screen. Fetches Lyrics & Album Covers
I couldn't figure out the lyrics provider, but QuuxPlayer fetches album covers from Last.fm along with artist biographies, and album details from the internet. There were of course a few hits and misses, as is bound to happen with auto-downloads. Automatically Updated PlaylistsApart from playlists which you can create by simple drag and drop, QuuxPlayer also gives you Automatic Playlists, which can be created on the fly by rules you create such as Artist = "Enigma". The advantage with Automatic playlists is that they can update automatically if new tracks are added to the library that subscribe to the rule set for the playlist. If any new song from the group Enigma is added, that gets added the next time you use the playlist.
QuuxPlayer also has Automatic File and Folder Monitoring and Update which helps to keep the player catch all the song files you add to your music folders. The 30 Band/ 10 Band Equalizer
Like to control the fidelity of your songs by hand? QuuxPlayer has an advanced 30 band and a simpler 10 band equalizer with user customized presets that help to fine tune the music. Tune Into Internet Radio & PodcastsYou can connect to a large number of online radio stations in a large number of genres from within QuuxPlayer and use it like a dedicated online radio player. Plus, you get to add your own radio streams too apart from the nearly 150 free radio stations that the player comes bundled with.
Auto-management of podcast feeds allows for easy download of new episodes when they become available. Music & The Tag Cloud
Is it the only music player that can show your music in the form of a tag cloud? We are so used to it on the web, that using it is almost second nature. Social Connections With Twitter & Last.fmQuuxPlayer makes it easy to share what you’re listening to with everyone who follows you on Twitter and Last.fm. With the account details, posting is automatic.
Sleep…
QuuxPlayer comes with a sleep mode for those times when you want to drift off to sleep while listening to music. You can set a timer and QuuxPlayer can fade off gradually. In the end you can choose to shut off only the player or your entire system. Hit F11 to switch on the Home Theatre PC Mode (bigger fonts and an improved layout for viewing from across the room), set the Sleep mode and stretch out while listening to some Miles Davis or Kenny G on the sax. When you wake up let us know your take on this small but full featured music player. Image Credit : labanex.com Hey Facebookers, make sure to check out MakeUseOf page on Facebook. Over 24,000 fans already!

Similar MakeUseOf Articles
| ||||||||||||||||||||||||
 Check out some of the latest MakeUseOf discoveries. All listed websites are FREE (or come with a decent free account option). No trials or buy-to-use craplets. For more cool websites and web app reviews subscribe to


 Did you know you could earn cash with
  Are you looking for a way to protect your computer from viruses and other malicious threats? We all need protection on our machines to keep all of our precious data safe, and sometimes the free programs just don’t cut it.


 If you’re in the market for a new computer, laptop, mobile phone, games and other accessories; don’t waste your time searching online. We’ve taken the liberty of locating the best tech deals and unifying them into a single post for your convenience.
 Although Apple’s iPhoto is not a high class professional image editor, it is still a powerful tool for editing and enhancing photos. It can transform a dull, bland and low contrast image and make it pop and sing with just a few added effects and exposure adjustments.


 Some music players come with the razzmatazz that you would associate with the media. Some just stay more down to earth and are functional to the core. QuuxPlayer belongs to the latter category.


| You are subscribed to email updates from MakeUseOf.com To stop receiving these emails, you may unsubscribe now. | Email delivery powered by Google |
| Google Inc., 20 West Kinzie, Chicago IL USA 60610 | |
No comments:
Post a Comment